Friday, June 28, 2019

1987 La Tâche and 1995 Romanée Saint-Vivant

My husband has mastered the art of slow smoking duck breast. His method adds a smokiness to the fat cap and keeps the duck nice and tender and juicy. He also has a berry sauce that is the perfect match for the smoked duck breast. We had the duck with a side of wild rice with mushrooms.
We had two wines to pair with the duck dinner. One was a 1987 La Tâche and the other was a 1995 Romanée Saint-Vivant. My husband decanted the La Tâche right as we were serving the duck. The color of the La Tâche was sparkling ruby in the glass. The edges of the La Tache in the wine glasses didn't show much oxidation for it's age. We tasted a blend of red cherries, a bit of spiciness and it was very well integrated with smooth tannins. The 1995 Romanée Saint-Vivant was more darkly extracted, looking more like dark garnet in the glass. It tasted very youthful and had a little tannin bite at the end. However, both wines were a delicious compliment to the smoked duck.
Sadly, that was the last of the La Tâche, but this may have been the right time to drink it. My husband claims that he has three more bottles of the 1995 Romanée Saint-Vivant, which I think can be cellared for many more years.

Tuesday, June 25, 2019

Chardonnay in Bloom

Our Chardonnay have begun to bloom. They may have started to bloom on Friday, when we had rain throughout the day. We noticed the blooms on Saturday when we were back in the vineyard working on the north end of the vineyard. It seemed that there were more Chardonnay in bloom on the north end compared to the south end. We think that the north end of the vineyard has more sun than the south end.
There is another rain event coming tomorrow, Tuesday, June 25. We hope that enough of the Chardonnay flowers have bloomed so that the rains will not have too much of an effect.

Sunday, June 23, 2019

Rain, Thank U, Next: Sunshine Please

We have had so many rainy days this spring and summer. Yesterday when we were in the vineyard doing chores, a veritable deluge came down which lasted only a few minutes, but enough to scare us off. So, what do we do when it is raining. Indoor chores, including testing our red wines.
In 2018, we had our first very small harvest of our red grapes which I blogged about in Vintage 2018: Cabernet Sauvignon and Cabernet Franc Harvest. We inoculated the Cabernet Sauvignon with VIN13 which we made into a rosé. For the Cabernet Franc, we decided to try our hand at making a red wine and used the yeast F15. F15 is a yeast that can yield fruity, round, and aromatic wines. The yeast also produces glycerol which can lead to wines with a good mouthfeel.
In addition to taking the parameters for our red wines, we also tasted it. The color was really nice. Without any fining or filtering, they were both very clear. Here is a view of our wines from the top:
Our tasting notes: The Cabernet Sauvignon rosé tasted like sour cherries, it was very dry and had a bit of tannin flavor. Our Cabernet Franc tasted a bit "stemmy".
Next up for our red is bottling time!

Thursday, June 20, 2019

A Tale of Two Net Positions

When we put up our netting in 2017, the question we asked ourselves was should the netting be "stored" up high or should the netting be kept low? Since my husband uses a mechanical weeder when the weeds grow, putting the netting low didn't seem to be such a good option. So, in 2017, after harvest, we rolled up the netting and kept it on the catchwire like so:
When growing season came last year, the netting that we rolled very tightly in the fall, looked like this after the winter and the winds.
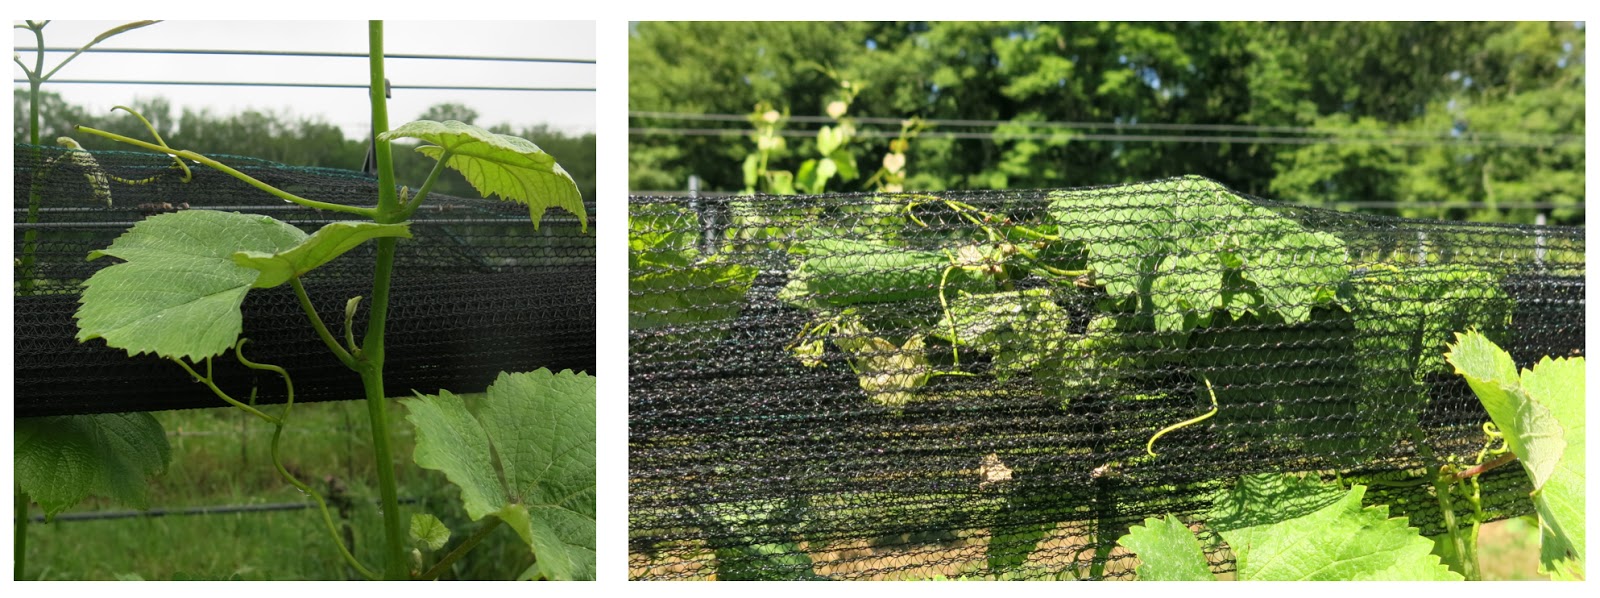
The loose netting created multiple problems including the vine growing outside of the netting, tendrils growing into the loose netting and the growing tips of the vines getting trapped in the netting.
A lot of care had to be taken to untangle the tendrils from the netting, move the tendrils into the catch wires and remove the growing tips of the vines from the netting.
This year, we knew that we had three problems that we had to address:
       1: How to move the netting so that we could avoid tendril issues
       2: Where to move the netting so that we could avoid tendril issues
       3: How to more securely cinch the netting so that it doesn't unfurl
To address the first issue, we switched over the netting from the catchwires to a moveable wire. We also decided to lift the netting to a higher trellis post setting during the initial growing season. For the third issue, we put more ties on the netting to secure it better. Here is our Chenin Blanc with the netting on the higher setting:
This is the result of moving the trellis wire in the Chardonnay which is way ahead of our Chenin Blanc in growth. It is much easier to shoot position the Chardonnay. If the vines have grown outside of the catch wires, it is not a problem to move them into the catch wires. Once all of the vines are at the top of trellis, we will move the rolled netting onto the lower setting in preparation for netting the grapes sometime in August.
We hope that this will alleviate the removal of the tendrils from the netting. We will see.

Friday, June 14, 2019

Waiting for Flowering

Our spring has been a cool one punctuated with weekly rain and our vines have been loving it! While we are behind in our task of shoot thinning, some of the vines have reached the top catch wires so we have to think about stringing more wire so that we can move our fixed wire netting to the moveable wire netting. We feel that we can avoid the problems that we faced last year when the grape vine tendrils wrapped around the netting and we spent and inordinate amount of time removing the tendrils from the netting. But, I digress.
Today, I want to blog about my go to online article, Ed Hellman's Grapevine Structure and Function. This article is an excellent reference about grapevine growth. It also contains detailed illustrations of the Principle Growth Stages of the grapevine.
Currently, our vineyard is at Principal growth stage 5: Inflorescence emerge, consisting of the following stages:
  • 53         Inflorescences clearly visible
  • 55         Inflorescences swelling, flowers closely pressed together
  • 57         Inflorescences fully developed; flowers separating
  • 61         Beginning of flowering: 10% of caps fallen
Keeping our eye out on flowering will allow us to fill out our chart of our annual cycle of grape vine growth:
I have been keeping this chart since 2015 when we had our first flowering and consequently our first very, very small harvest. Keeping this information helps us to see what happened in the past and how to plan for the future in terms of flowering, harvest, etc. But, as always, Mother Nature has a huge role in this. Our chart is merely a guideline.
References:
1. Ed Hellman, Grapevine Structure and Function.

Tuesday, June 11, 2019

Vintage 2019: June Update

This spring has been incredible for grape vine growth. We are still in the midst of shoot thinning and awaiting bloom. The temperature has been quite moderate, in the mid 70's and Mother Nature has blessed us with rains in the evening that usually end at dawn. How nice is that! Consequently, one of our vines, Chardonnay clone 76 has already reached the top trellis wire. That is simply amazing! We have never seen that kind of accelerated growth before bloom.
This is really good because for next year's canes, the spacing between the nodes will be just right. We couldn't have asked for better weather. Today is yet another rain day with clearing in the afternoon, so we can address the second law of thermodynamics occuring in our home environment.
My friend said to me one day as we were exercising, "You must really LOVE working in the vineyard because it takes LOVE to do what you are doing." I agreed with her. Not all the things that my husband and I do in the vineyard is work(LOVE). One afternoon after mowing, my husband had to get a tool from home (long story), and I was left in the vineyard with my camera. Earlier, he mentioned that there was a baby bird under his tractor and the mommy and daddy birds were creating a distraction in order for the baby bird to escape from my husband. He was able to get a few shots with his feeble iPhone.
While I was waiting for my husband to return, I took these photos, with a better camera, but I am a feeble photographer. We think that it is a yellow warbler.
It is unexpected interactions like these that we love and wouldn't have if we were not working in the vineyard. We hope that along with our grape vines, we are providing a habitat for all kinds of wild life.

Sunday, June 9, 2019

Vineyard Test

My husband and I are still shoot thinning. Yesterday, I came across this Chenin Blanc plant. Ha! I thought to myself, fool me will you? (Yoda like voice). See what I was seeing? Early in our viticultural life we became familiar with what our vines should look like, including what our rootstock should look like. This physical vine knowledge is called ampelography. You don't need to be an ampelographer to be able to tell what leaves should look like, you just have to be working in the vineyard for a few years to see this difference. Our first brush with rootstock came shortly after planting our vines in 2013 and I blogged about it in June 2013, titling the blog Ampelography 101: A Test in the Vineyard.
In 2018, we came across another vineyard test in our Auxerrois, a white variety which had a few Cabernet Sauvignon plants mixed in. To see what we were seeing, check out this blogpost: Ampelography: What Leaves Can Tell Us.
Today's test was our rootstock taking up a perfect position in the Chenin Blanc, hoping to camouflage itself among the Chenin Blanc shoots. I looked at our graft union and sure enough, this healthy looking 101-14 MGT was growing from below the graft union.
You can be sure that that rootstock had a short life. How it got to be that tall is a mystery!

Friday, June 7, 2019

Vineyard Findings: Yellowjacket Nest

My husband said that he found a bee's nest while working in the Cabernet Franc. It fell off the vine as he pruned it. When I saw him, I said, you need to go back there and get it. Easy for me to say, what if "stinging things" were living in it. I always thought that this was a nest of the paper wasp. When I googled paper wasp nest, I was surprised to read that this was really the nest of a yellow jacket!
Further digging into the Internet, lead me to the information that there are two types of yellow jackets, the aerial (Dolichovespula) and the ground or cavity (Vespula) nesting yellow jackets. The yellow jackets are not bees, they are wasps.
Most yellow jackets are ground nesting wasps. Here is a diagram of what their underground nests can look like.1 Ground-nesting yellowjackets construct paper nests that may contain thousands of larvae and adult workers. When spring arrives, the queen selects a nesting site and the process of nest construction, egg deposition, and food hunting begins. The foraging adult workers are the "baddies". These ground-nesting yellowjacket workers commonly come into contact with people who are eating outdoors and these yellowjacket workers may become extremely aggressive.

What we have is the nest of an aerial yellow jacket, the Dolichovespula. Aerial nesting yellow jacket wasps usually have somewhat more accessible nesting sites and are an important type of native pollinator and are strictly predatory, hunting only live insects and nectar to feed to their young.
In looking at pictures of aerial and ground yellowjackets as well as hornets, it was difficult to tell which was which. Best to stay clear of all and be careful.
References:
1. Marin Sonoma Mosquito and Vector Control District, Yellowjackets.
2. Lynn Braband, Jody Gangloff-Kaufmann, Carolyn Klass and Deb Marvin, Integrated Pest Management for Stinging Insects, Cornell University and NYS IPM Program.
3. Pest Control Plus, Yellow Jackets – Facts, Nests and Control Methods.

Wednesday, June 5, 2019

2018 Wölffer Estate Rosé

It's that summer time of the year and time for quaffing a good rosé. We had this 2018 Wölffer Estate Rosé at M Bar in Mystic, CT. We went on a Wednesday evening and found that it was half price for bottle night so we both chose this rosé to have with our meals. The color might throw you off a little because it is not pink but coppery orange in color. It tasted light and dry to us but had strawberry notes to it and we wondered what grape it was made from. It was not until we got home and I looked it up that the tasting notes said that the rosé was made from 52% Merlot, 20% Chardonnay, 13% Cabernet Franc, 11% Cabernet Sauvignon, 2% Sauvignon Blanc, 1% Riesling, 1% Pinot Noir. My husband mentioned that you could get it for about $18.00 so this might be one that we put on our summer drinking list.